
As the day begins to fade and the aroma of sweet chocolate fills the air, I can’t help but think about my favorite indulgence: the No-Bake Chocolate Berry Tart. This stunning dessert is not only easy to whip up in under an hour, but it’s also a showstopper that can turn any ordinary moment into a luscious celebration. Packed with a rich chocolate filling nestled in a crunchy gluten-free crust, it’s both vegan and refined sugar-free, making it a guilt-free indulgence that everyone can enjoy. Whether it’s for a special occasion like Valentine’s Day or simply to treat yourself, this tart will have family and friends swooning with delight. Curious about how to create a dessert that looks as exquisite as it tastes? Let’s dive in!

Why is This Tart a Must-Try?
Decadent flavor: This No-Bake Chocolate Berry Tart features a rich and silky chocolate filling that ensures every bite is a delightful indulgence.
Effortless preparation: With no baking required, you can create this stunning dessert in under an hour, making it perfect for those spontaneous sweet cravings.
Adaptable for everyone: Being vegan, gluten-free, and refined sugar-free means this tart caters to a wide range of dietary preferences, ensuring no one misses out.
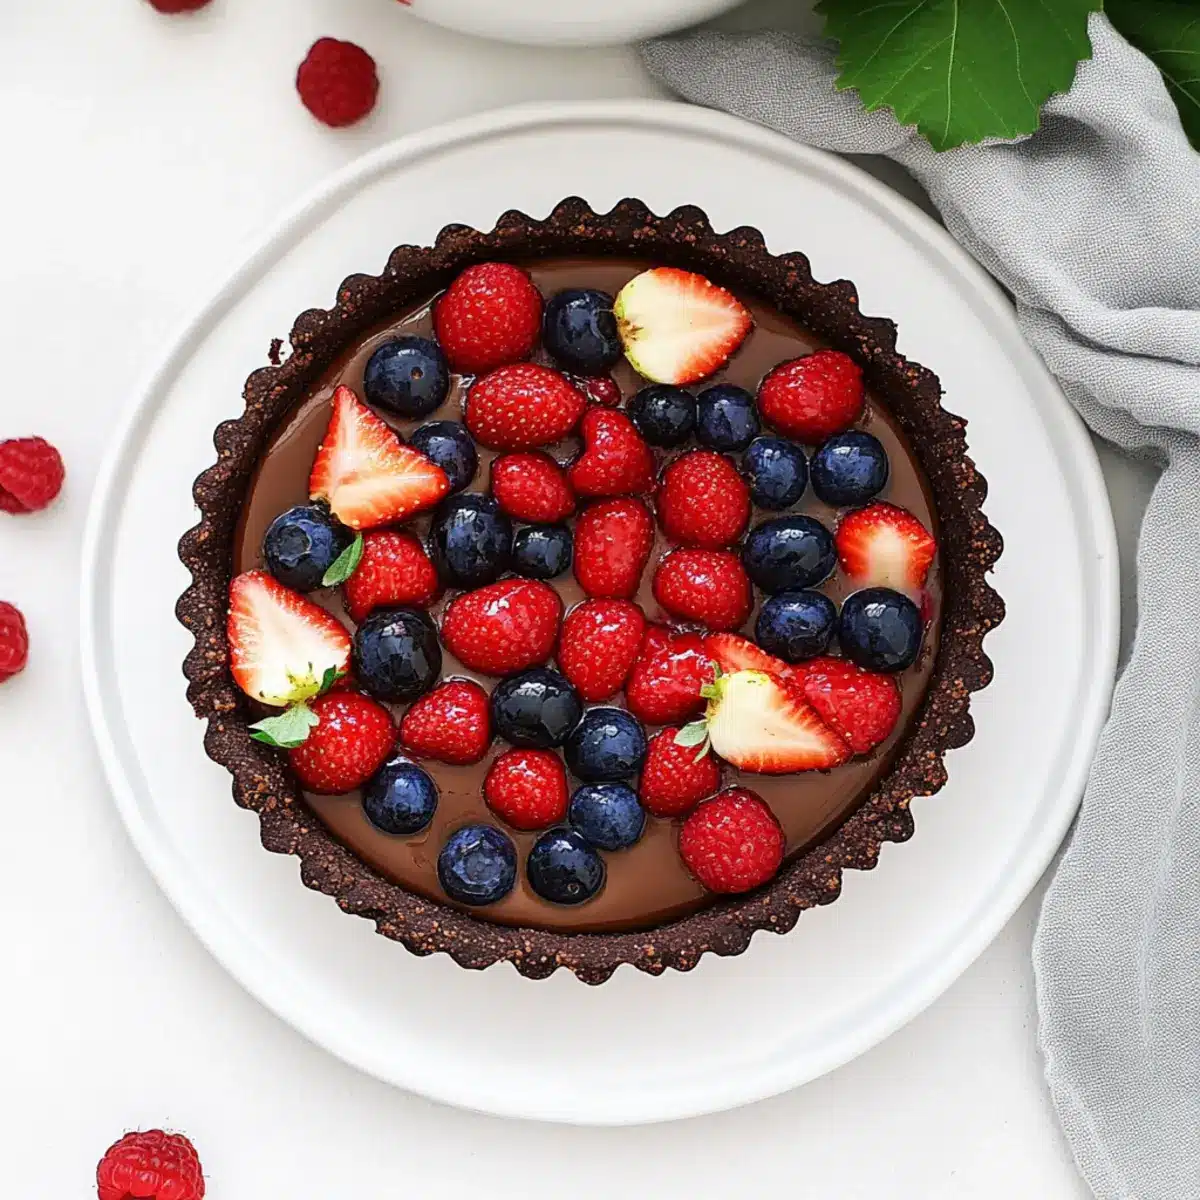
Visual appeal: Topped with vibrant fresh berries, it’s a feast for the eyes that elevates everyday meals into something exceptional, just like the Summer Berry Icebox Cake.
Chilled perfection: Serve it straight from the fridge for a refreshing treat that balances creamy chocolate with tart berries, reminiscent of the delightful Banana Bread Chocolate flavors.
Your taste buds are about to rejoice!
No-Bake Chocolate Berry Tart Ingredients
For the Crust
• Cocoa Powder – Provides intense chocolate flavor and color; make sure to use unsweetened cocoa powder for the best results.
• Oats – Forms the base of the crust, offering a gluten-free structure while also adding texture; ensure you use certified gluten-free oats.
• Maple Syrup – Acts as a natural sweetener that binds the crust and filling together; agave syrup can be used as a substitution.
• Coconut Oil – Used for richness and to help set the filling; vegan butter may work as an alternative, but coconut oil is preferred for the structure.
For the Filling
• Canned Coconut Milk – Provides creaminess to the filling; opt for canned as it has a higher fat content than boxed versions.
• Cocoa Powder – Added again for intensified chocolate flavor in the filling; remember to use unsweetened for the best taste.
• Maple Syrup – Works here as well for sweetness and binding; it complements the chocolate beautifully to create a lush filling.
For the Topping
• Fresh Berries (e.g., strawberries, blueberries) – Adds a fresh and tart contrast to the rich chocolate; avoid frozen berries as they may release too much juice.
Step‑by‑Step Instructions for No-Bake Chocolate Berry Tart
Step 1: Prepare the Crust
In a food processor, combine oats, cocoa powder, maple syrup, and melted coconut oil. Blend until the mixture is sticky and holds together when pressed. This typically takes about 1-2 minutes. Once ready, transfer the mixture into a tart pan and firmly press it down to form an even crust. The edges should look clean and smooth to hold the filling nicely.
Step 2: Make the Filling
Using the same food processor, add canned coconut milk, additional cocoa powder, maple syrup, and melted coconut oil. Blend until the mixture reaches a silky and creamy texture, approximately 1-2 minutes. Scrape down the sides as necessary to ensure everything is well combined. The filling should be rich and glossy, perfectly suited for the No-Bake Chocolate Berry Tart.
Step 3: Assemble the Tart
Carefully pour the chocolate filling into the prepared crust and spread it evenly using an offset spatula. This step allows for a beautiful, smooth surface. Once filled, gently shake the tart pan to level out the filling. Place the tart in the refrigerator to chill for at least 30 minutes, allowing it to set and firm up before serving.
Step 4: Add Berries
Right before serving, top the chilled tart with an assortment of fresh berries. Artfully arrange strawberries and blueberries on the chocolate filling to provide a vibrant contrast. Make sure to place the berries right before serving to maintain their freshness and prevent the tart from becoming soggy, showcasing the appeal of your No-Bake Chocolate Berry Tart beautifully.

What to Serve with No-Bake Chocolate Berry Tart
Pair this decadent chocolate tart with delightful accompaniments to elevate your dessert experience.
-
Fresh Mint Leaves: A sprinkle of fresh mint adds a refreshing burst, enhancing the chocolate’s richness and creating a lovely aroma.
-
Coconut Whipped Cream: This light and fluffy topping provides a delicious contrast to the dense chocolate, making each bite feel indulgent yet airy.
-
Dark Chocolate Shavings: Add a gourmet touch with dark chocolate shavings on top, amplifying the chocolate flavor and providing a slight crunch.
-
Balsamic Reduction: A drizzle of balsamic reduction introduces a tangy sweetness that pairs beautifully with the berries, enhancing their flavor.
-
Vanilla Bean Ice Cream: Creamy vanilla ice cream serves as a rich contrast to the tart, balancing the chocolate’s depth with a sweet and creamy texture.
-
Chilled Herbal Tea: A refreshing herbal tea, like mint or chamomile, complements the tart’s flavors while offering a relaxing beverage option.
-
Sparkling Water with Citrus: Serve with citrus-infused sparkling water to cleanse the palate, enhancing the sweetness of the tart’s chocolate and berries.
Expert Tips for No-Bake Chocolate Berry Tart
-
Quality Ingredients: Use high-quality cocoa powder and maple syrup for a richer flavor. The quality can significantly enhance your No-Bake Chocolate Berry Tart’s taste.
-
Chill Time Matters: Allow the tart to chill for at least 30 minutes, but for the best results, letting it sit for an hour or more helps the filling firm up beautifully.
-
Berry Freshness: Add berries just before serving to maintain their freshness. This not only allows for a pop of color but also ensures a delightful textural contrast with the creamy filling.
-
Crust Consistency: When blending the crust ingredients, ensure the mixture sticks together well. If it’s too crumbly, add a teaspoon more coconut oil or maple syrup to achieve the right consistency.
-
Stored Leftovers: If you have leftovers, store the tart without berries in an airtight container in the fridge. This helps prevent the tart from getting soggy while keeping it fresh for 4-5 days.
Variations & Substitutions for No-Bake Chocolate Berry Tart
Feel free to get creative and make this No-Bake Chocolate Berry Tart uniquely yours with these fun variations!
-
Nut-Based Crust: Swap cocoa crust for a mixture of ground almonds or walnuts for a boost in flavor and texture. It’s a delightful twist that adds extra nuttiness and crunch!
-
Different Berries: Use a variety of fresh fruits, like raspberries or sliced kiwi, to add a colorful touch and a different taste profile. Each fruit introduces a new layer of excitement to this tart!
-
Flavored Extracts: Enhance the filling by incorporating flavored extracts, such as vanilla or almond, for an additional layer of depth. Just a teaspoon can elevate your dessert into realms of flavor you never thought possible.
-
Chocolate Overload: To intensify the chocolate experience, add dark chocolate chips to the filling before blending. This will make each bite even more decadent and luscious.
-
Creamy Alternatives: Consider using cashew cream instead of coconut milk for a different creamy texture and flavor. It adds a twist that can surprise your taste buds beautifully.
-
Spicy Kick: Add a pinch of cayenne pepper or chili powder to the filling for a subtle, warm heat that contrasts with the sweetness. This spicy touch will intrigue your adventurous palate!
-
Coconut Flakes: Sprinkle sweetened or unsweetened coconut flakes on top along with the fresh berries for added texture and a tropical twist. Each bite will transport you to a sunny paradise!
-
Fruit Preserves: For a luscious glaze, brush the tart with a thin layer of fruit preserves before adding the fresh berries. This glaze adds an attractive shine and extra fruit flavor that’s hard to resist.
When you explore these variations, don’t forget to check out our other delightful recipes like Chocolate Biscoff Tart or the creamy Whipped Hot Chocolate for even more inspiration!
How to Store and Freeze No-Bake Chocolate Berry Tart
Fridge: Store the tart without berries in an airtight container for up to 4-5 days. The chilling process ensures it stays fresh and the flavors develop beautifully.
Freezer: For longer storage, this No-Bake Chocolate Berry Tart can be frozen for up to 2-3 weeks. Slice it before freezing for easy serving later.
Berries: Add fresh berries only before serving. This keeps them vibrant and prevents the tart from getting soggy, ensuring your dessert looks as appealing as it tastes.
Reheating: No need to reheat this tart; serve it chilled straight from the fridge for the best creamy and flavorful experience!
Make Ahead Options
The No-Bake Chocolate Berry Tart is perfect for meal prep enthusiasts! You can prepare both the crust and the filling up to 24 hours in advance, allowing you to save time for busy weeknights or special occasions. Simply make the crust by blending the oats, cocoa powder, maple syrup, and coconut oil, then press it into the tart pan. Next, blend the coconut milk, cocoa powder, maple syrup, and coconut oil for the filling, and pour it into the prepared crust. To maintain the tart’s quality, store it covered in the refrigerator until ready to serve. Just before serving, top with fresh berries to preserve their vibrant color and freshness, ensuring your No-Bake Chocolate Berry Tart looks and tastes just as delicious as if it were made on the spot!
No-Bake Chocolate Berry Tart Recipe FAQs
What kind of oats should I use for the crust?
Absolutely! For the crust, you need to use certified gluten-free oats. This ensures that your No-Bake Chocolate Berry Tart remains gluten-free while providing a robust base with great texture. Regular oats may contain gluten, which could affect those with sensitivities.
How should I store my No-Bake Chocolate Berry Tart?
Store the tart without the berries in an airtight container in the refrigerator for up to 4-5 days. This method keeps it fresh and allows the flavors to develop beautifully. If you want to enjoy it later, you can freeze the tart individually sliced for convenience, up to 2-3 weeks.
Can I freeze the No-Bake Chocolate Berry Tart?
Yes, you can absolutely freeze it! To do so, slice the tart first for easy serving later. Wrap each slice tightly in plastic wrap or aluminum foil, then place them in a freezer-safe container. When you want to enjoy a piece, simply take it out and let it thaw in the refrigerator—no reheating needed!
What if my crust mixture is too crumbly?
No worries! If your crust mixture feels too crumbly and doesn’t hold together well, you can add a teaspoon more of melted coconut oil or maple syrup. Blend it back and check until it reaches the right sticky consistency that holds when pressed together.
Are there any allergies I should consider with this recipe?
Very! Be mindful that while this No-Bake Chocolate Berry Tart is vegan and gluten-free, it contains coconut and oats, which can be allergens for some. Always double-check your ingredients, especially if serving to guests with dietary restrictions. This way, you can ensure that everyone can happily indulge without worries!
What berries work best for topping the tart?
I often recommend strawberries and blueberries for the tart because they provide a delightful freshness and color contrast against the rich chocolate. Ensure you use fresh berries right before serving to maintain their vibrant appearance and juicy texture, avoiding frozen berries which can make the tart soggy.

Decadent No-Bake Chocolate Berry Tart for Sweet Indulgence
Ingredients
Equipment
Method
- In a food processor, combine oats, cocoa powder, maple syrup, and melted coconut oil. Blend until sticky, about 1-2 minutes. Press the mixture into a tart pan.
- Add canned coconut milk, cocoa powder, maple syrup, and melted coconut oil to the food processor. Blend until silky, about 1-2 minutes. Scrape down sides as needed.
- Pour the chocolate filling into the prepared crust and spread evenly. Chill in the refrigerator for at least 30 minutes.
- Before serving, top with fresh berries arranged on the chocolate filling.
Leave a Reply