
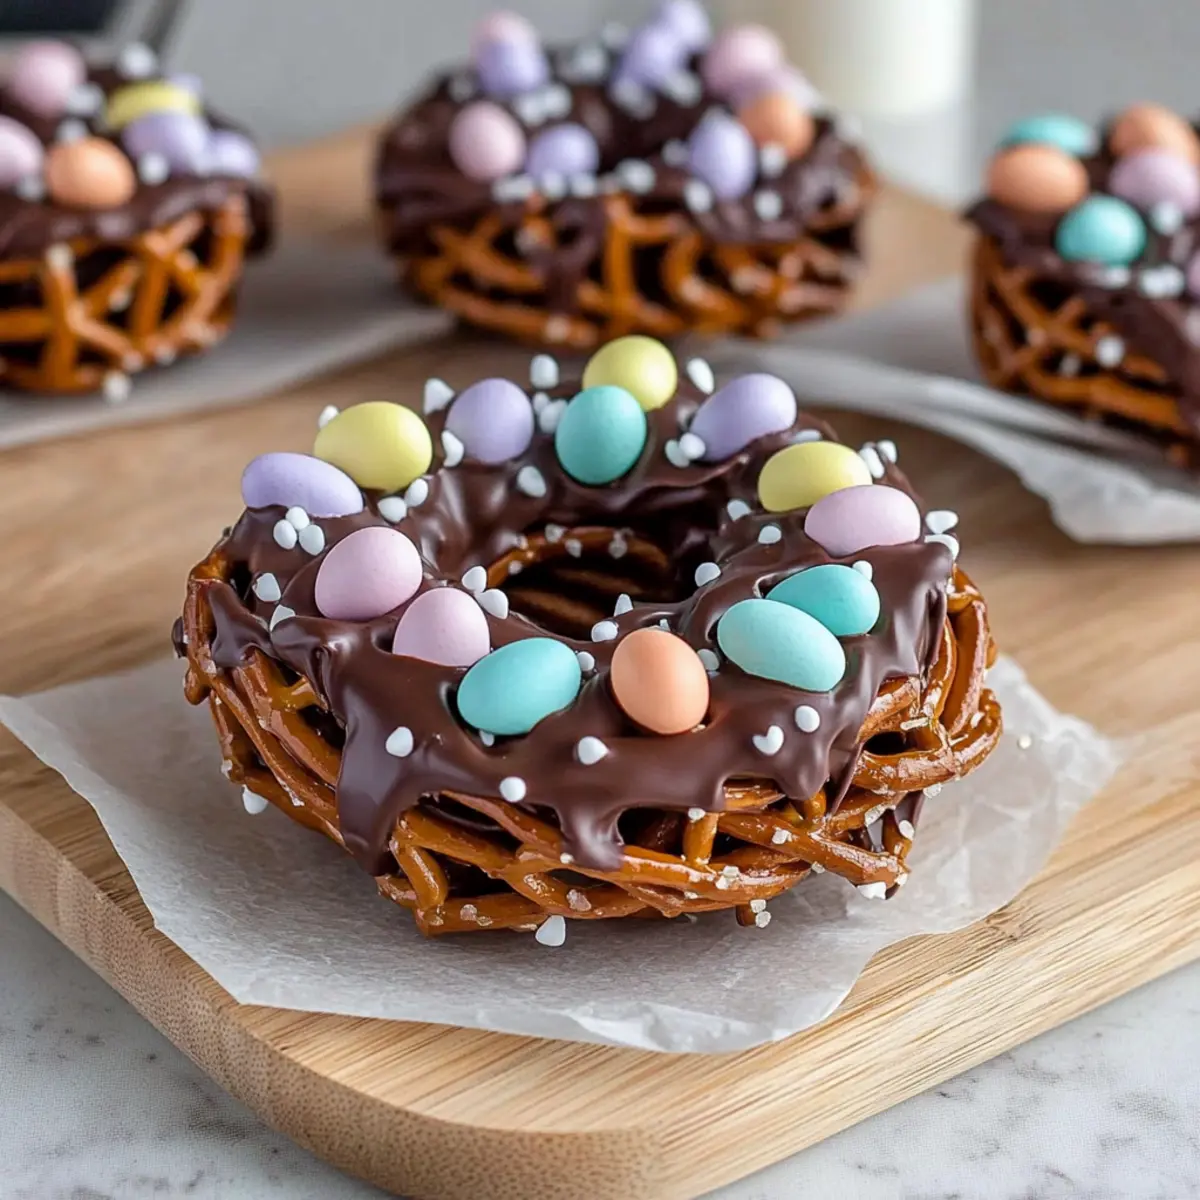
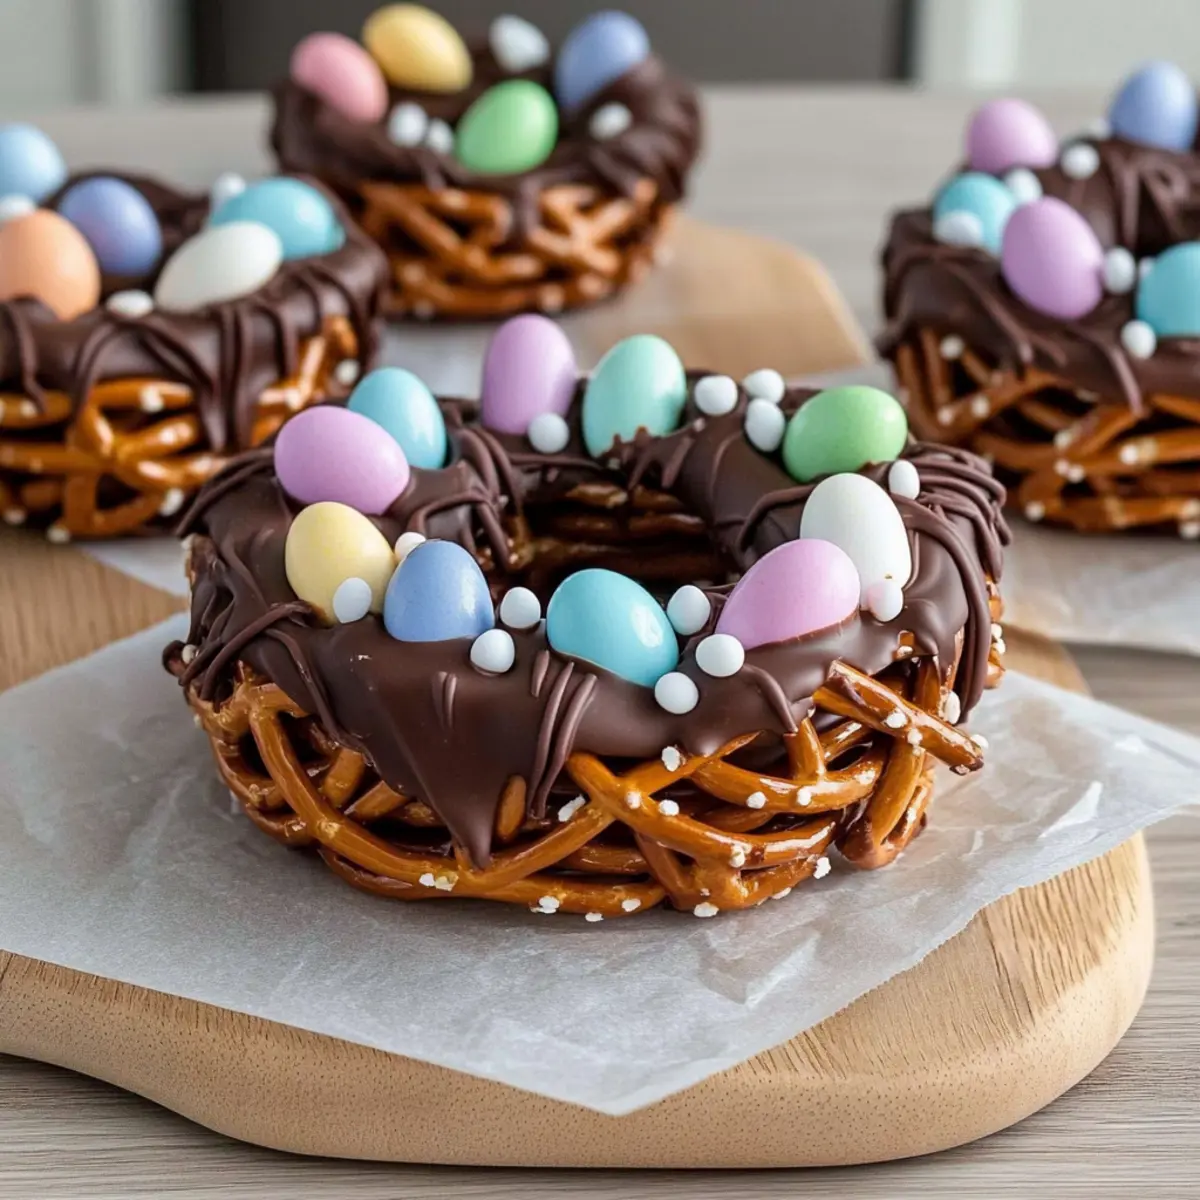
As I unwrapped the colorful candies, the vibrant hues reminded me that spring was finally here. Nothing says festive like making Chocolate-Covered Pretzel Nests, those delightful little treats that perfectly marry crunchy pretzels with rich chocolate. These no-bake delights not only come together in a flash but are also highly customizable, making them a fun activity to share with kids and friends. Whether you’re celebrating Easter or just welcoming the season, these nests are a whimsical addition that’s sure to please a crowd. With just a handful of ingredients, you’ll create a sweet surprise that adds charm to any gathering. So grab your pretzels and chocolate, and let’s get to nest-building! What colorful candy toppings will you choose?
Why You’ll Adore These Nests?
Quick and Easy: With no baking required, you can whip these up in no time, making them a perfect last-minute treat for any gathering.
Customizable Bliss: Choose your favorite chocolates and candy toppings—transform them into unique creations that reflect your style!
Kid-Friendly Fun: Get the little ones involved in shaping and decorating these nests, turning snack time into quality bonding moments.
Festive Vibes: Brighten your spring celebrations with these charming treats that are sure to catch everyone’s eye, similar to our Parmesan Soft Pretzels in their appeal!
Crowd-Pleasing Delight: From family gatherings to parties, these nests are always a hit, bringing smiles with every crunchy, chocolatey bite.
Sweet Versatility: Whether for Easter or just because, the flavor combinations are endless—experiment with different fillings like in our Chocolate Covered Stuffed Dates for more inspiration!
Chocolate-Covered Pretzel Nests Ingredients
For the Nests
• Pretzel Sticks – Provide structure and a salty crunch; use gluten-free pretzels for a gluten-free version.
• Milk Chocolate Chips – The sweet element that binds the nests together; any high-quality chocolate can be substituted.
• Mini Candy Eggs – Serve as the decorative filling and focal point of the nests; try pastel M&M’s or jellybeans for variety.
For Optional Fillings
• Shredded Coconut – Enhances the nest appearance for a more authentic look; omit if coconut isn’t preferred.
• Sprinkles – Adds decorative flair and color; use sprinkles that complement the theme, like pastel colors for Easter.
Now that you have everything prepped, let’s start building those sweet, whimsical Chocolate-Covered Pretzel Nests!
Step‑by‑Step Instructions for Chocolate-Covered Pretzel Nests
Step 1: Melt the Chocolate
Start by placing your chosen milk chocolate chips in a microwave-safe bowl. Heat the chocolate in the microwave in 20-second intervals, stirring after each session, until it is completely melted and smooth—this should take about 1 to 2 minutes in total. Make sure there are no lumps, as smooth chocolate will provide the best coating for your Chocolate-Covered Pretzel Nests.
Step 2: Coat the Pretzels
Once the chocolate is melted, add your pretzel sticks to the bowl. Gently fold the pretzels in the chocolate, ensuring each one is thoroughly coated. Use a fork or spoon to lift them out, allowing excess chocolate to drip back into the bowl. This step is crucial for achieving an even chocolate coating that enhances the sweetness of your nests while balancing the saltiness of the pretzels.
Step 3: Form the Nests
Prepare a baking sheet by lining it with parchment paper or a silicone mat to prevent sticking. Take small handfuls of the coated pretzels and shape them into nest-like forms on the lined sheet, creating a slight indent in the center of each nest. Aim for a round shape with a cozy little seat for candy—this is where the delicious visual appeal of your Chocolate-Covered Pretzel Nests will take shape!
Step 4: Add Eggs and Toppings
Before the chocolate begins to set, carefully place your mini candy eggs in the center of each pretzel nest. You can also sprinkle shredded coconut or pastel sprinkles over the top to enhance the festive look. This step adds not just flavor but also color and charm to your Chocolate-Covered Pretzel Nests, making them perfect for your spring celebrations!
Step 5: Chill and Set
Transfer the baking sheet to the refrigerator and let the nests chill for 20-30 minutes, or until the chocolate has completely hardened. This is essential for ensuring the nests hold their shape and are easy to serve. Once set, you’ll have delightful Chocolate-Covered Pretzel Nests that are ready to be enjoyed at any spring gathering!

Expert Tips for Chocolate-Covered Pretzel Nests
• Ideal Chocolate Temperature: Ensure your chocolate is fully melted and smooth to achieve an even coating on the pretzels, preventing clumps and ensuring that every bite is delightful.
• Parchment Paper Usage: Use parchment paper or a silicone mat on the baking sheet to prevent the nests from sticking, making clean-up a breeze and preserving their shape.
• Creative Toppings: Experiment with various candies and colors for the nests to keep them fresh and exciting every time, finding inspiration in seasonal themes or your favorite flavors.
• Chilling Time: Don’t rush the cooling process! Allow the nests to chill for a full 30 minutes to set properly so they hold their charming shape and can be easily enjoyed.
• Batch Preparation: Consider doubling the recipe to have plenty of Chocolate-Covered Pretzel Nests on hand for gatherings, as they’re sure to disappear quickly!
Storage Tips for Chocolate-Covered Pretzel Nests
Room Temperature: Store your Chocolate-Covered Pretzel Nests in an airtight container at room temperature for up to 1 week, away from direct sunlight.
Fridge: In warm climates, refrigerate the nests to maintain their shape and freshness; they can last up to 2 weeks when chilled.
Freezer: For longer storage, freeze the nests for up to 2 months. Make sure to place them in a single layer in an airtight container to prevent sticking.
Reheating: No need to reheat; enjoy these treats cold or at room temperature for a delightful crunch and the perfect blend of chocolate and pretzel flavors!
What to Serve with Chocolate-Covered Pretzel Nests?
These delightful treats can shine even brighter with the perfect accompaniments that create a memorable and festive experience.
-
Fresh Fruit Salad: A refreshing medley of seasonal fruits balances the sweetness, adding vibrant colors and a healthy twist to your treat table. The juiciness of strawberries and oranges enhances the festive spring vibes!
-
Vanilla Ice Cream: Creamy and cool, a scoop of vanilla ice cream pairs beautifully with the crunchy nests, providing a soothing contrast to the rich chocolate. Drizzle with caramel for an extra indulgent touch.
-
Chocolate Milk: This classic drink complements the chocolatey goodness, making it a kid-favorite at any Easter gathering. Serve it cold for a nostalgic treat that brings smiles.
-
Bunny-Shaped Sandwiches: Create whimsical sandwiches with cookie cutters to elevate your party themes. Choose spreads like peanut butter and jelly to keep things simple and enjoyable for kids.
-
Carrot Sticks with Hummus: Offer crunchy carrot sticks with a creamy hummus dip for a healthy, festive option that brings just the right amount of color and crunch to your spread, pairing nicely with the sweetness of the nests.
-
Sparkling Lemonade: Refreshing and bright, sparkling lemonade adds a bubbly zest to your celebration. This lively drink uplifts the atmosphere, enhancing the fun of your festive gathering.
Don’t forget to enjoy these Chocolate-Covered Pretzel Nests with your favorite springtime delights!
Chocolate-Covered Pretzel Nests Variations
Get creative and tailor these treats to your taste buds, crafting your perfect Chocolate-Covered Pretzel Nests!
-
Dairy-Free: Substitute chocolate chips with dairy-free versions to cater to dietary needs while keeping all the deliciousness intact.
-
Decadent Dark Chocolate: Switch to dark chocolate for a richer flavor profile—this twist will impress chocolate lovers!
-
Colorful White Chocolate: Melt and tint white chocolate with food coloring for vibrant nests that delight the eyes as much as the taste buds.
-
Nutty Crunch: Add chopped nuts (like almonds or peanuts) into the pretzel mixture for an added layer of crunch that elevates texture.
-
Mini Egg Variety: Instead of candy eggs, try using assorted mini chocolates or seasonal candies, creating a fun surprise in each bite.
-
Coconut-Free Version: Omit shredded coconut entirely, focusing on the chocolate and pretzel flavors, perfect for those who aren’t coconut fans.
-
Spiced Sweetness: Introduce a sprinkle of cinnamon or nutmeg to the melted chocolate for a unique flavor twist that warms the taste buds.
-
Festive Theme: Tailor them to various holidays by changing the colors of your sprinkles and candies, making each batch special—like festive versions for Easter or Halloween!
With these delightful variations, you’ll be inspired to whip up different takes on your Chocolate-Covered Pretzel Nests, creating a variety of textures and flavors that will keep everyone guessing. So why not enjoy some Chocolate-Covered Stuffed Dates as an alternative treat and inspire your next dessert adventure?
Make Ahead Options
These Chocolate-Covered Pretzel Nests are perfect for meal prep, making your busy schedule a little easier! You can prepare the nests up to 24 hours in advance. To do this, shape the coated pretzel nests and refrigerate them on a lined baking sheet for about 20-30 minutes until solid. Once set, store them in an airtight container in the fridge. Just before serving, add mini candy eggs and any desired toppings, as this will ensure they remain vibrant and appealing. With this make-ahead method, you’ll have a delightful treat ready to impress your guests without any last-minute fuss!
Chocolate-Covered Pretzel Nests Recipe FAQs
What type of pretzels should I use?
I recommend using regular pretzel sticks for their structural integrity and delightful salty crunch. If you need a gluten-free option, simply swap them out for gluten-free pretzels, which will still deliver that satisfying texture and flavor!
How should I store my Chocolate-Covered Pretzel Nests?
These sweet treats can be stored in an airtight container at room temperature for up to one week. If you’re in a warm climate, I suggest refrigerating them, where they can last up to two weeks, ensuring the chocolate retains its lovely shape and stays fresh.
Can I freeze Chocolate-Covered Pretzel Nests?
Absolutely! You can freeze your nests for up to two months. To do this, place them in a single layer in an airtight container to prevent sticking. When you’re ready to enjoy them, just let them thaw at room temperature—no need to reheat!
What if my chocolate doesn’t melt smoothly?
If your chocolate seizes or doesn’t melt smoothly, it’s often due to moisture. Make sure to use a completely dry bowl when melting. If you encounter clumps after melting, you can add a teaspoon of vegetable oil or coconut oil to smooth it out. Just remember to heat gently and stir frequently to achieve that velvety texture!
Are there any dietary considerations I should be aware of?
Yes, while the base recipe is quite friendly for many diets, do keep in mind potential allergies. If you’re making these for guests, check for nut allergies, as you might want to avoid adding nuts as toppings. Also, consider substituting the chocolate with dairy-free options if there are lactose sensitivities. Enjoying these nests can be flexible to fit most dietary needs!
Can I make these ahead of time?
Definitely! You can prepare your Chocolate-Covered Pretzel Nests a day in advance. Just ensure you give them enough time to set in the refrigerator, allowing the chocolate to harden fully before serving. This way, you can make them one less thing to worry about on the day of your gathering!

Chocolate-Covered Pretzel Nests for a Fun Easter Treat
Ingredients
Equipment
Method
- Start by placing your chosen milk chocolate chips in a microwave-safe bowl. Heat the chocolate in the microwave in 20-second intervals, stirring after each session, until melted and smooth.
- Once melted, add your pretzel sticks to the bowl. Gently fold the pretzels in the chocolate, ensuring each is thoroughly coated.
- Line a baking sheet with parchment paper. Take small handfuls of the coated pretzels and shape them into nest-like forms on the lined sheet.
- Before the chocolate sets, place your mini candy eggs in the center of each pretzel nest. Sprinkle shredded coconut or pastel sprinkles if desired.
- Transfer the baking sheet to the refrigerator and let the nests chill for 20-30 minutes, or until the chocolate has completely hardened.
Leave a Reply