
As I stood in my kitchen, the citrusy aroma of fresh lemons mingled with the warmth of the sun streaming through the window, creating an invigorating atmosphere. These Gluten Free Lemon Poppyseed Scones have quickly become my go-to recipe, transforming any mundane morning into a delightful culinary experience. With their light and fluffy texture, these scones not only offer a gluten-free alternative that everyone can enjoy, but they also make for an elegant treat that’s perfect for brunch or an afternoon pick-me-up. The combination of zesty lemon and a touch of nutty poppyseeds will leave your taste buds dancing and your heart full. Are you ready to learn how to whip up these delightful scones that will impress friends and family alike?

Why will you love these scones?
Simplicity at its finest: With straightforward ingredients, these Gluten Free Lemon Scones are easy to whip up, even for novice bakers.
Zesty flavor explosion: Each bite offers a refreshing burst of lemon, perfectly balanced with the nutty crunch of poppyseeds, making them a flavor sensation.
Versatility galore: Enjoy them as a breakfast delight, an afternoon snack, or even at your next brunch gathering with friends!
Light and fluffy texture: Experience the delightful crumbliness of these scones, creating a melt-in-your-mouth moment with every bite.
Quick and effortless: Ready to delight your guests in just over 30 minutes, these scones are a perfect solution for busy mornings.
Crowd-pleaser guaranteed: Everyone, gluten-free or not, will love these delightful treats. Pair them with your favorite jam or serve alongside tea, and watch the smiles appear! If you want to explore more great recipes, check out my Sticky Lemon Cauliflower or try out the delicious Lemon Oreo Dessert.
Gluten Free Lemon Scones Ingredients
• Here’s everything you’ll need to create your scrumptious gluten free lemon scones.
For the Scones
- Lemon Zest (from 2 medium lemons) – Adds bright citrus flavor; use organic lemons for the best results.
- Granulated Sugar (100 grams) – Sweetens the dough; essential for balancing the tartness of lemons.
- Gluten Free Multipurpose Flour (300 grams) – Provides structure; opt for a “structure flour heavy” blend to avoid a dense texture.
- Baking Powder (14 grams / 1 tablespoon) – Acts as a leavening agent for rise; ensure freshness for best results.
- Poppyseeds (9 grams / 1 tablespoon) – Adds visual appeal and nutty flavor; optional but highly recommended.
- Kosher Salt (1/2 teaspoon) – Enhances flavor; adjust if using a different salt brand as potency may vary.
- Unsalted Butter (113 grams, cold) – Contributes to flakiness; grate for easier incorporation if necessary.
- Kefir (or Buttermilk, 125 grams) – Adds moisture and tanginess; can substitute with homemade buttermilk using milk and vinegar.
- Large Egg (1) – Binds ingredients together; whisk until frothy before adding to the mixture.
- Fresh Lemon Juice (25 grams) – Enhances lemon flavor; freshly squeezed is preferred for brightness.
For the Glaze
- Powdered Sugar (50 grams) – Used for the glaze; can adjust lemon juice to achieve the desired consistency.
- Raw Sugar – For sprinkling on top; adds crunch and sweetness.
Step‑by‑Step Instructions for Gluten Free Lemon Scones
Step 1: Prepare the Baking Sheet
Begin by lining a baking sheet with parchment paper to prevent sticking and facilitate easy cleanup. Set it aside while you mix the dough. This preparation ensures a smooth transition when you’re ready to bake your Gluten Free Lemon Scones.
Step 2: Mix Dry Ingredients
In a medium-sized bowl, whisk together the gluten-free multipurpose flour, baking powder, poppyseeds, and kosher salt until well combined. This step helps to evenly distribute the leavening agents, ensuring your scones rise beautifully. Set the bowl aside for later use.
Step 3: Infuse Lemon Flavor
In a large mixing bowl, combine the granulated sugar and the lemon zest. Using your fingertips, rub the zest into the sugar for about a minute; this action releases the essential oils from the zest, creating a fragrant and flavorful base for the Gluten Free Lemon Scones.
Step 4: Combine Ingredients
Pour the dry mixture into the lemon-sugar combination, gently folding the ingredients together until just incorporated. Avoid overmixing, as this may result in dense scones. The mixture should feel crumbly yet cohesive, indicating you’re on the right track.
Step 5: Incorporate Cold Butter
Cut the cold unsalted butter into small cubes before adding it to the flour mixture. Using a pastry cutter or your fingertips, work the butter into the dry ingredients until the texture resembles coarse crumbs. This step creates the tender, flaky layers characteristic of light and fluffy scones.
Step 6: Combine Wet Ingredients
In a separate bowl, whisk together the kefir, large egg, and fresh lemon juice until frothy. This mixture adds moisture and tang to the dough. Gradually pour the wet ingredients into the dry mixture, stirring gently until a cohesive dough forms without any dry patches.
Step 7: Shape the Dough
Transfer the dough to the lined baking sheet and, using your hands, shape it into a rectangle measuring about 7×5 inches. Be careful not to knead the dough; a light touch is key to achieving the desired fluffy texture in your Gluten Free Lemon Scones.
Step 8: Create Layers
Fold the dough in half three times without kneading, creating layers that promote flakiness. If the dough feels sticky, chill it briefly in the refrigerator for about 5-10 minutes to make it easier to handle. This step enhances the texture of your scones.
Step 9: Final Shape & Chill
Shape the folded dough into a 6-inch circle, about ¾ inch thick, and place it back on the parchment-lined baking sheet. Refrigerate for at least 10 minutes to firm up the dough, which helps maintain its shape while baking and enhances the scone’s fluffiness.
Step 10: Preheat and Cut the Dough
Preheat your oven to 400°F (200°C). While the oven heats, remove the chilled dough from the fridge and cut it into 8 equal triangles. A sharp knife or pizza cutter works best for clean cuts. This action prepares your Gluten Free Lemon Scones for even baking.
Step 11: Brush and Sprinkle
Gently brush the tops of the cut scones with a bit of kefir, then generously sprinkle raw sugar over them for a delightful crunch. This small step adds a beautiful finishing touch that enhances both flavor and texture when baked.
Step 12: Bake to Perfection
Place the baking sheet in the oven and bake the scones for 22-26 minutes, or until they are golden brown on top. Keep an eye on them during the last few minutes, as visual cues of doneness will ensure a perfect batch of Gluten Free Lemon Scones.
Step 13: Cool and Glaze
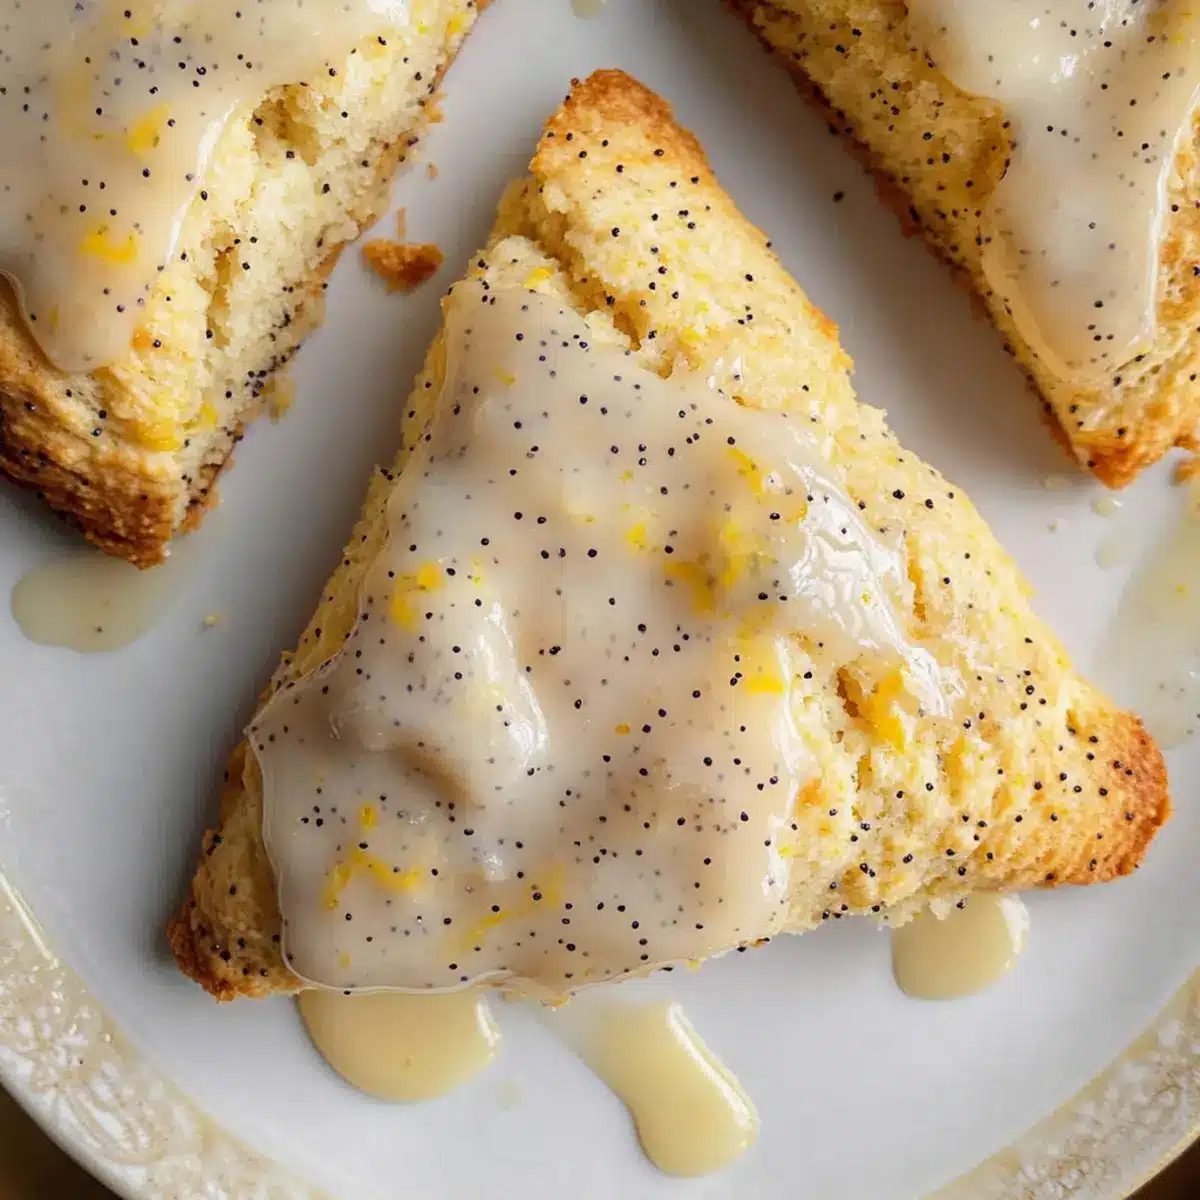
Once baked, allow the scones to cool on the sheet tray for about 10 minutes. Meanwhile, prepare the glaze by whisking the powdered sugar with lemon juice until smooth. Once cooled, drizzle this delicious glaze over the scones for an extra burst of lemony goodness.

Gluten Free Lemon Scones Variations
Feel free to explore these delectable twists that will elevate your scones to new heights of flavor and satisfaction!
-
Berry Delight: Substitute poppyseeds with fresh blueberries or raspberries for a juicy, fruity flavor burst. The sweet, tart notes of berries create a delightful contrast to the zesty lemon.
-
Nutty Addition: Add chopped walnuts or pecans for a crunchy texture and earthy flavor. This nutty twist brings a beautiful depth that complements both the citrus and the scone’s fluffiness.
-
Citrus Trio: Experiment with different citrus zest, like lime or orange, for a bright and refreshing variation. Each citrus offers its unique flavor profile, making your scones unique every time!
-
Herbal Infusion: Incorporate a teaspoon of fresh thyme or rosemary to the dough; the herbal notes will provide an intriguing twist that surprises and delights the palate.
-
Sweet Heat: Add a pinch of cayenne pepper or a dash of ground ginger for a spicy kick. This subtle heat pairs wonderfully with the sweet and tangy lemon, creating a well-rounded flavor.
-
Dairy-Free Option: Swap kefir with almond milk or coconut milk to make these scones dairy-free without compromising taste. Using these alternatives brings a lightness that is equally scrumptious!
-
Vegan Twist: Replace the egg with a flaxseed egg or chia egg to enjoy these scones as a fully vegan treat. Simply mix 1 tablespoon of ground flaxseed or chia seeds with 2.5 tablespoons of water and let it sit until thickened.
-
Lemon Poppyseed Muffins: Transform this scone recipe into delightful muffins by pouring the batter into a muffin tin. Adjust the baking time to around 18-20 minutes for perfectly fluffy muffins; serve them warm with a drizzle of glaze!
Let your imagination run wild with these variations. If you’re curious about more citrus-inspired recipes, be sure to check out my Lemon Oreo Dessert that will surely brighten your day!
Expert Tips for Gluten Free Lemon Scones
-
Use Fresh Ingredients: Ensure your baking powder is fresh for optimal rise; expired powder can lead to flat scones.
-
Avoid Overmixing: Combine dry and wet ingredients gently to prevent dense scones. Stop mixing as soon as no dry flour remains visible.
-
Chill Dough for Fluffiness: Refrigerate the dough between folds if it becomes sticky; this keeps gluten-free lemon scones light and airy.
-
Measure Accurately: Use a kitchen scale for precise measurements, especially for flour, to ensure perfect texture and consistency.
-
Experiment with Flavors: Don’t hesitate to swap poppyseeds with dried fruit or nuts for a unique twist on these scrumptious scones!
-
Serve Fresh: For the best taste and texture, serve gluten-free lemon scones on the day they’re baked; store in an airtight container for up to 3 days.
Storage Tips for Gluten Free Lemon Scones
Room Temperature: Best enjoyed the day they are baked; store in an airtight container for up to 3 days to maintain freshness.
Fridge: If keeping longer, place the scones in the fridge, wrapped tightly, where they’ll last for up to 5 days. Allow to come to room temperature before serving.
Freezer: Freeze baked scones for up to 3 months; place in a freezer-safe bag to prevent freezer burn. Reheat directly from frozen, adding a few extra minutes to bake time.
Reheating: For warmed scones, pop them in a preheated oven at 350°F (175°C) for about 5-10 minutes until warmed through. Enjoy your gluten-free lemon scones just like fresh!
What to Serve with Gluten Free Lemon Scones
Delightful accompaniments can elevate your scone experience from tasty to truly memorable, creating a spread that shines.
-
Fresh Berries: Berries like strawberries or blueberries complement the lemon flavors, adding a vibrant sweetness that brightens each bite.
-
Clotted Cream: Rich and creamy, this luscious treat adds a sumptuous touch, making your scones feel extra indulgent during afternoon tea.
-
Herbal Tea: A soothing cup of chamomile or peppermint tea can enhance the zesty notes, providing a calming contrast that’s perfect for a cozy moment.
-
Honey Yogurt: Creamy yogurt drizzled with honey offers a slightly tart and sweet contrast that beautifully balances the lemony brightness of the scones.
-
Jam Varieties: Pair with homemade lemon curd or raspberry jam for a delightful spread that enhances flavor and adds a touch of nostalgia.
-
Sparkling Water with Lemon: Refreshing sparkling water, uplifted with sliced lemon, makes for a bright and bubbly pairing that cleanses the palate.
Imagine serving these fluffy delights alongside a warm cup of tea, where each bite brings smiles and satisfaction. Whether for brunch with friends or a simple afternoon snack, these pairings create unforgettable moments around your table.
Make Ahead Options
These Gluten Free Lemon Scones are a fantastic option for meal prep that will save you time during busy mornings or brunch prep! You can prepare the scone dough and shape it into a circle up to 24 hours in advance; simply wrap it tightly in plastic wrap and refrigerate it. This helps maintain the dough’s freshness and prevents any browning. When you’re ready to enjoy the scones, just slice them and follow the baking instructions as usual. If you want even more convenience, consider baking them now and freezing the baked scones for up to 3 months. To reheat, simply warm in the oven for a few minutes until they are just as delightful as fresh!

Gluten Free Lemon Scones Recipe FAQs
What type of lemons should I use for the scones?
I recommend using organic lemons to ensure you get the best flavor and quality. The zest from two medium lemons will really make your scones pop with a bright citrus aroma!
How should I store the scones after baking?
For the best flavor, enjoy your gluten-free lemon scones on the day they are baked. If you need to store them, keep them in an airtight container at room temperature for up to 3 days. If you want to keep them longer, refrigerate them wrapped tightly for up to 5 days.
Can I freeze these scones?
Absolutely! You can freeze baked gluten-free lemon scones for up to 3 months. Just place them in a freezer-safe bag, and to reheat, bake them straight from the freezer at 350°F (175°C) for about 5-10 minutes. Enjoy them warm and fresh!
What if my scones are too dense?
If your scones turn out dense, it might be due to overmixing the dough. Remember to mix just until combined and handle the dough gently. Ensuring your baking powder is fresh can also help achieve that light, fluffy texture you desire.
Are there any substitutes for kefir in this recipe?
Yes! If you don’t have kefir, buttermilk is a great alternative. You can also make your own buttermilk by mixing 1 cup of milk with 1 tablespoon of vinegar or lemon juice and letting it sit for about 5-10 minutes. This will replicate the tanginess you need for the scones.
Is this recipe safe for those with nut allergies?
Yes, this recipe is nut-free unless you choose to add nuts as a variation. However, always double-check your gluten-free flour blend’s ingredients to ensure it hasn’t been processed in a facility with nuts if cross-contamination is a concern.
Delicious Gluten Free Lemon Scones That Will Brighten Your Day
Ingredients
Equipment
Method
- Prepare the Baking Sheet: Line a baking sheet with parchment paper to prevent sticking and facilitate easy cleanup.
- Mix Dry Ingredients: In a medium-sized bowl, whisk together the gluten-free multipurpose flour, baking powder, poppyseeds, and kosher salt.
- Infuse Lemon Flavor: In a large mixing bowl, combine the granulated sugar and lemon zest, rubbing the zest into the sugar.
- Combine Ingredients: Pour the dry mixture into the lemon-sugar mixture, gently folding until just incorporated.
- Incorporate Cold Butter: Cut the cold unsalted butter into small cubes and mix until the texture resembles coarse crumbs.
- Combine Wet Ingredients: In a separate bowl, whisk together kefir, egg, and lemon juice until frothy; then add to the dry mixture.
- Shape the Dough: Transfer the dough to the lined baking sheet and shape into a rectangle measuring about 7×5 inches.
- Create Layers: Fold the dough in half three times without kneading; chill briefly if sticky.
- Final Shape & Chill: Shape the folded dough into a 6-inch circle, about ¾ inch thick, and refrigerate for at least 10 minutes.
- Preheat and Cut the Dough: Preheat the oven to 400°F (200°C) and cut the chilled dough into 8 equal triangles.
- Brush and Sprinkle: Brush the tops of the cut scones with kefir and sprinkle raw sugar over them.
- Bake to Perfection: Bake for 22-26 minutes, or until golden brown on top.
- Cool and Glaze: Allow to cool for about 10 minutes, then drizzle with glaze prepared from powdered sugar and lemon juice.
Leave a Reply