
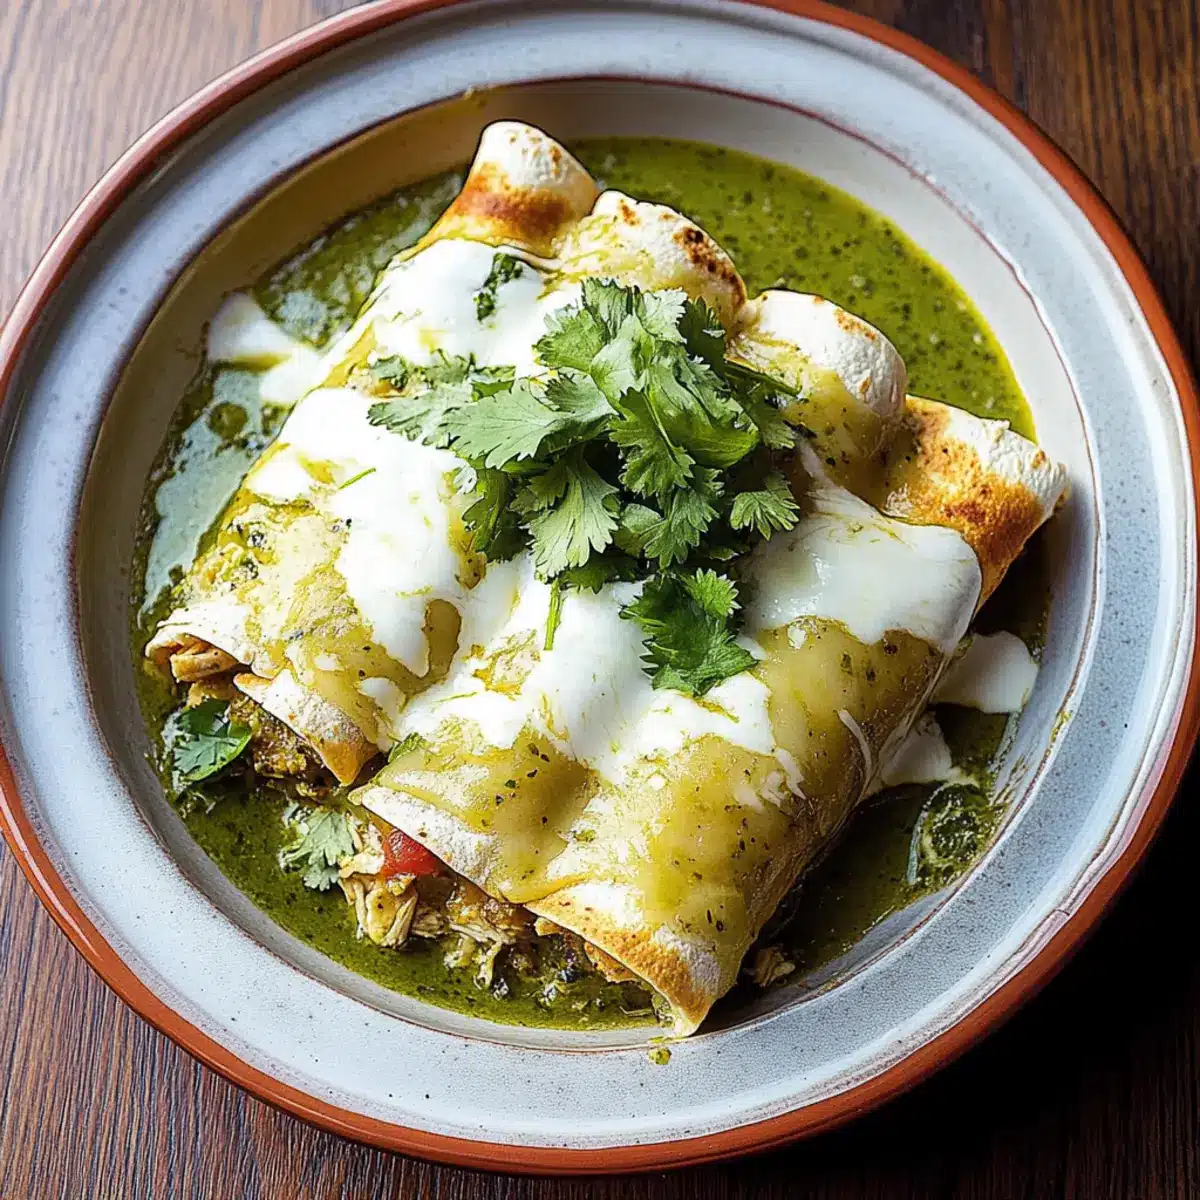
The tantalizing aroma of roasted chicken wafted through the air as I prepped my favorite weeknight dinner: Enchiladas Suizas. This creamy comfort food, with its rich green salsa and gooey cheese, transforms an ordinary evening into a culinary celebration. With its versatility, you can easily customize these enchiladas to suit everyone’s taste—beef, chicken, or even a delightful vegetarian option. In just under an hour, you can serve a meal that not only pleases the palate but also warms the hearts of those gathered around your table. Whether you’re entertaining guests or simply treating yourself after a long day, these enchiladas are the perfect choice. Ready to discover how to create this unforgettable dish?

Why are Enchiladas Suizas a Must-Try?
Comforting and Creamy: With a luscious green enchilada sauce and gooey cheese, these Enchiladas Suizas bring warmth and satisfaction to your dinner table.
Versatile Options: Whether you prefer shredded chicken, ground beef, or a hearty vegetable mix, this recipe easily adapts to your tastes, making it perfect for everyone.
Time-Saving Perfection: Ready in under an hour, this dish is ideal for busy weeknights or impromptu gatherings.
Crowd-Pleasing Appeal: Friends and family will rave about this recipe, ensuring you’ll be asked for seconds (or thirds)!
Make-Ahead Convenience: You can assemble these delicious enchiladas in advance, making meal prep a breeze—just bake when you’re ready to eat.
Once you try these creamy enchiladas, you’ll want to make them a staple in your home! For more easy weeknight dinner ideas, check out my Quick Dinner Recipes that everyone will love.
Enchiladas Suizas Ingredients
For the Enchiladas
- Corn Tortillas – Essential for an authentic taste; substitute with flour tortillas for a lighter option.
- Olive Oil – Used for sautéing; enhances flavor during the cooking process.
- Cooked Shredded Chicken – Main protein; convenience meets flavor if you use rotisserie chicken.
- Sour Cream – Adds creaminess; crema can be substituted for an even more authentic experience.
- Green Enchilada Sauce/Salsa Verde – The heart of the dish, contributing both creaminess and flavor.
- Chicken Broth – Keeps the filling moist and delicious.
- Shredded Cheese (Monterey Jack/Mexican blend) – Provides that melty, rich topping we all love.
- Onion – Enhances depth of flavor; sautéed until soft for the best results.
- Garlic – Brings an aromatic punch to the mix.
- Fresh Cilantro – Adds a touch of freshness as a vibrant garnish.
- Salt and Pepper – Essential for balancing and enhancing the flavors in your Enchiladas Suizas.
Optional Toppings
- Avocado Slices – Provide a creamy texture and complement the flavors beautifully.
- Pickled Jalapeños – Add a zesty kick for those who love a bit of heat.
- Lime Wedges – Squeeze over the top for a burst of freshness right before serving.
With these ingredients on hand, you’re well on your way to creating irresistible Enchiladas Suizas that are sure to impress!
Step‑by‑Step Instructions for Enchiladas Suizas
Step 1: Preheat the Oven
Begin by preheating your oven to 375°F (190°C). This ensures your Enchiladas Suizas will bake perfectly, allowing the cheese to bubble and turn golden brown. While the oven warms up, gather your ingredients and get ready to sauté the onion and garlic for a fragrant base.
Step 2: Sauté Onions and Garlic
In a skillet, heat a tablespoon of olive oil over medium heat. Add finely chopped onion and minced garlic, and sauté for about 3-4 minutes, stirring frequently until soft and fragrant. This step builds a wonderful flavor foundation for your creamy Enchiladas Suizas, setting the tone for the dish.
Step 3: Combine Chicken Filling
Next, add your cooked shredded chicken to the skillet along with chicken broth and green enchilada sauce. Stir everything together, ensuring the chicken is well-coated. Let it simmer for about 5 minutes on medium-low heat, stirring occasionally. The mixture should be warmed through and fragrant, ready to fill your tortillas.
Step 4: Prepare the Tortillas
To keep your corn tortillas pliable and easy to roll, lightly fry each one in a separate skillet over medium heat for about 30 seconds on each side. You want them to soften without becoming crispy. This technique prevents the tortillas from breaking and adds a touch of flavor, preparing them for the delicious chicken filling.
Step 5: Mix the Creamy Sauce
In a small bowl, combine sour cream with a tablespoon of the enchilada sauce you prepared earlier. This creamy mixture will enhance the flavor of your Enchiladas Suizas and serve as a luscious topping. Set this aside; it will be drizzled over the enchiladas after baking to elevate the dish.
Step 6: Assemble the Enchiladas
Spread a small amount of the chicken mixture on the bottom of a baking dish to prevent sticking. Take each warmed tortilla, fill it with the chicken mixture, roll it up, and place it seam-side down in the dish. Continue until all the tortillas are filled and nestled comfortably in the baking dish, creating a cozy nest for baking.
Step 7: Add Sauce and Cheese
Pour the remaining chicken mixture over the rolled tortillas, ensuring they’re covered evenly. Carefully sprinkle a generous layer of shredded cheese on top, creating that melty, gooey deliciousness that makes Enchiladas Suizas so irresistible. This final touch is essential for achieving the perfect gooey topping.
Step 8: Bake to Perfection
Carefully place the baking dish in your preheated oven and bake for 20-25 minutes. You’re looking for the cheese to be bubbly and golden, the sign that your Enchiladas Suizas are perfectly baked. If you like an extra crispy top, broil for an additional 2 minutes, keeping a close watch to prevent burning.
Step 9: Serve and Garnish
Once baked, remove the Enchiladas Suizas from the oven and let them sit for a few minutes to set. Drizzle the creamy sour cream mixture over the top and garnish with fresh cilantro for a burst of color and flavor. Serve hot, inviting friends and family to dig into this comforting homemade delight.

Expert Tips for Enchiladas Suizas
-
Tortilla Technique: Lightly fry corn tortillas to prevent sogginess. This keeps them pliable and prevents breaks when rolling.
-
Flavor Boost: Enhance your filling by incorporating herbs or spices like cumin or smoked paprika for an extra kick.
-
Creaminess Factor: Mix in a bit of cream cheese with your sour cream for an even richer topping that complements the Enchiladas Suizas beautifully.
-
Cheese Choice: Experiment with different cheeses like queso fresco or pepper jack for a unique twist on the classic flavor profile.
-
Make Ahead: Prepare your Enchiladas Suizas in advance and refrigerate before baking. Just pop them in the oven when you’re ready to serve!
How to Store and Freeze Enchiladas Suizas
Fridge: Store leftover Enchiladas Suizas in an airtight container for up to 3 days. Reheat in the oven at 350°F (175°C) until warmed through for best results.
Freezer: Freeze unbaked Enchiladas Suizas for up to 2 months. Wrap tightly in plastic wrap and foil. Bake from frozen at 375°F (190°C) for 30-40 minutes; add extra time if melting cheese is desired.
Reheating: To reheat baked Enchiladas Suizas, place in a preheated oven at 350°F (175°C) for 15-20 minutes until cheese is bubbly. A splash of chicken broth can keep them moist.
Assembly Tip: You can assemble these enchiladas ahead of time and freeze them. When ready to enjoy, simply bake them directly from the freezer for a delicious, comforting meal on busy nights.
What to Serve with Creamy Enchiladas Suizas?
There’s nothing like pairing flavorful dishes that elevate the comforting experience of your meal together.
- Mexican Rice: A classic side that adds texture and absorbs the delicious green sauce from the enchiladas. Each bite offers a satisfying blend of flavors.
- Refried Beans: Creamy and filling, they’re a perfect complement to the richness of the enchiladas. Plus, the protein keeps everyone satisfied!
- Zesty Side Salad: A crisp salad with lime vinaigrette brings freshness to every mouthful, cutting through the richness and enhancing overall balance.
- Guacamole: This luscious dip enriches the meal and adds a cool, creamy contrast to the warm enchiladas. A scoop on top is always a good idea!
- Grilled Corn on the Cob: Sweet and smokey, grilled corn pairs beautifully with the creamy enchiladas, bringing a summer feel to every bite.
- Pickled Jalapeños: For those who like a little heat, these bring the perfect zesty kick. They can be served on the side or scattered atop enchiladas for color.
- Lime Wedges: A squeeze of lime brightens up each serving, adding a burst of freshness that cuts through the richness of the dish.
- Churros: Finish off your meal with these sweet, fried treats dusted with cinnamon sugar for a delightful and warm dessert!
Each pairing enriches the dining experience, creating a comforting and satisfying meal your loved ones will adore!
Make Ahead Options
These Enchiladas Suizas are perfect for meal prep, allowing you to save time on busy weeknights! You can assemble the enchiladas up to 24 hours in advance, simply layering the filling and tortillas in the baking dish without baking. To maintain quality, cover the dish tightly with plastic wrap or foil and refrigerate. When you’re ready to enjoy them, preheat your oven and bake for 20-25 minutes until the cheese is bubbly and golden. If you wish to go even further, the assembled enchiladas can be stored in the freezer for up to 3 months; just allow for a longer baking time from frozen. This way, you can easily create a comforting family meal with minimal effort!
Enchiladas Suizas: Customization Galore!
Feel free to let your creativity shine as you adapt these delicious enchiladas to match your taste preferences and dietary needs!
-
Protein Swap: Replace shredded chicken with ground beef, pulled pork, or sautéed mushrooms for a vegetarian option. Each filling brings a different flavor profile to your dish.
-
Dairy-Free Delight: Use plant-based cream cheese or skip the sour cream to make it dairy-free while still maintaining creaminess in the sauce. Consider adding nutritional yeast for that cheesy flavor!
-
Heat It Up: For an added kick, toss in some sliced jalapeños or a drizzle of hot sauce over your enchiladas before baking. Spice levels can be adjusted to suit your family’s preferences!
-
Vegetable Fusion: Turn into a veggie lover’s dream by stuffing tortillas with a mix of sautéed peppers, zucchini, and black beans. This can add a colorful and nutritious twist to the dish.
-
Herbal Infusion: Experiment by adding fresh herbs like cilantro or parsley and spices such as cumin or smoked paprika to the filling. It elevates the dish with dimension and freshness.
-
Cheese Variations: Try different cheese blends, like pepper jack or queso fresco, for a unique twist. Cheese not only enhances flavor but provides an enticing melted texture on top.
-
Make-Ahead Freezer Meal: Assemble your enchiladas with a variety of fillings, then freeze unbaked. When you’re in a dinner rush, just pop them into the oven for an effortless meal!
-
Pack a Crunch: Top with crispy tortilla strips or crushed tortilla chips before serving for a delightful texture contrast. It’ll add that satisfying crunch that keeps everyone coming back for more.
You can make your Enchiladas Suizas truly special with these variations. For more filling ideas, check out my Vegetarian Dinner Ideas for inspiration to keep your meals fresh and exciting!

Enchiladas Suizas Recipe FAQs
How do I choose the right tortillas for Enchiladas Suizas?
Absolutely! For the best texture and authenticity, I recommend using corn tortillas. Look for fresh corn tortillas that are pliable without dark spots all over; this indicates freshness. If you prefer a softer and lighter texture, flour tortillas can be a wonderful alternative.
How should I store leftover Enchiladas Suizas?
Very easily! Store your leftover Enchiladas Suizas in an airtight container in the fridge for up to 3 days. When you’re ready to enjoy them again, simply reheat in the oven at 350°F (175°C) until warmed through, which should take about 15-20 minutes.
Can I freeze Enchiladas Suizas, and how do I do it?
Absolutely! You can freeze unbaked Enchiladas Suizas for up to 2 months. Wrap them tightly in plastic wrap followed by aluminum foil to prevent freezer burn. When you’re ready-to-eat, bake directly from frozen at 375°F (190°C) for 30-40 minutes. Just keep an eye on them to ensure the cheese melts beautifully!
What if my tortillas break when I roll them?
No worries! If you encounter breakage with your tortillas, it usually means they weren’t properly warmed. Make sure to lightly fry each tortilla for about 30 seconds on each side to make them pliable. If breakage happens, just roll them gently, and don’t stress—those burrito-style enchiladas will still be delicious!
Are there any dietary considerations for Enchiladas Suizas?
Very much so! If you have gluten sensitivities, you can easily make these gluten-free by using corn tortillas. Additionally, if you’re preparing these for guests with allergies, always double-check the ingredients in your green salsa and cheese. Substituting dairy products can also cater to lactose intolerance by using dairy-free alternatives for the sour cream and cheese.
How long can I assemble the enchiladas in advance?
You can assemble your Enchiladas Suizas up to 24 hours in advance! Cover the baking dish tightly with plastic wrap and refrigerate. When you’re ready to bake, simply pop them in the oven without needing to thaw. This make-ahead option is a lifesaver for busy weeknights!
Creamy Enchiladas Suizas for the Perfect Cozy Dinner
Ingredients
Equipment
Method
- Preheat your oven to 375°F (190°C).
- In a skillet, heat olive oil over medium heat. Sauté chopped onion and minced garlic for about 3-4 minutes until soft.
- Add cooked shredded chicken, chicken broth, and green enchilada sauce to the skillet. Stir and simmer for 5 minutes.
- Lightly fry each corn tortilla in a skillet for about 30 seconds on each side to keep them pliable.
- Combine sour cream with a tablespoon of enchilada sauce in a small bowl and set aside.
- Spread a small amount of the chicken mixture in a baking dish, then fill each tortilla, roll, and place seam-side down in the dish.
- Pour the remaining chicken mixture over the tortillas and sprinkle shredded cheese on top.
- Bake in the preheated oven for 20-25 minutes until cheese is bubbly and golden.
- Let sit for a few minutes, drizzle with the sour cream mixture, and garnish with fresh cilantro before serving.
Leave a Reply