
I never thought that a dessert could bring back a whirlwind of childhood memories, but then I discovered the magic of a Biscoff Icebox Cake. With just four ingredients, this no-bake delight layers crunchy Biscoff cookies with a velvety cookie butter cream that transports you back to those carefree days. Not only is it incredibly quick to whip up, but it also makes entertaining feel effortless, as you can prepare it ahead of time and freeze it until guests arrive. The rich and creamy texture pairs beautifully with the subtly spiced crunch of the cookies, making it an indulgent treat that will leave everyone craving more. Curious to see how you can create this delightful cake in your own kitchen? Let’s dive into the sweetness!
Why is Biscoff Icebox Cake so irresistible?
Simplicity at its finest: With only four ingredients, this no-bake dessert is a breeze to create. Decadent flavor: The luscious cookie butter cream combined with crunchy cookies delivers an explosion of taste in every bite. Perfect for gatherings: Make it in advance to wow your guests with minimal effort. Versatile options: You can swap flavors by trying different cookie butters or adding a chocolate drizzle. This cake is a foolproof way to elevate any occasion, much like our delightful Berry Icebox Cake or the luscious Peach Cobbler Cheesecake. Indulge yourself in the blend of nostalgia and bliss this Biscoff Icebox Cake has to offer!
Biscoff Icebox Cake Ingredients
• Simple and delightful!
For the Whipped Cream Mixture
- Heavy Cream – This ingredient provides rich texture and aeration; remember to use cold cream for the best whipping outcomes.
- Sweetened Condensed Milk – Integrates sweetness and creaminess; you can substitute it with powdered sugar for quicker preparation.
- Lotus Biscoff Spread – The key flavoring element with a deliciously unique taste; feel free to swap it for any cookie butter or speculoos spread you enjoy.
For Layering
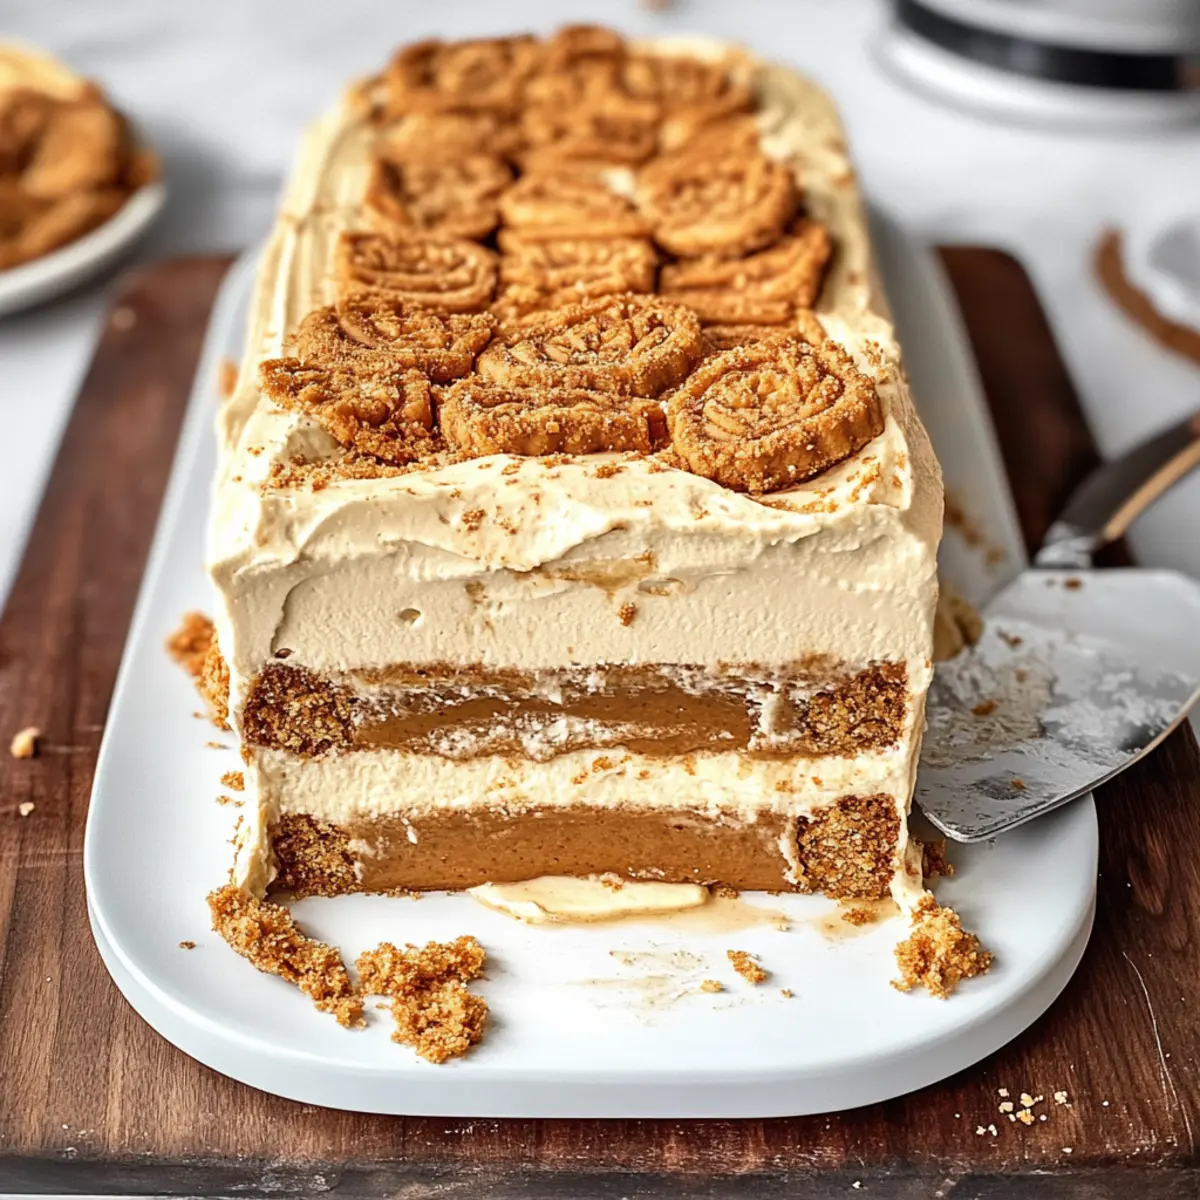
- Lotus Biscoff Biscuits – These are essential for layering to create that delightful texture; you can use any brand of speculoos biscuits if needed.
This Biscoff Icebox Cake’s enticing simplicity and rich flavors make it a standout dessert that will surely impress your family and friends!
Step‑by‑Step Instructions for Biscoff Icebox Cake
Step 1: Prepare the Whipped Cream Mixture
In a large, cold mixing bowl, combine heavy cream and sweetened condensed milk. Using a cold whisk or electric mixer, whip the mixture on medium-high speed for about 3-5 minutes until you achieve stiff peaks. The cream should be thick and hold its shape, indicating it’s ready to become part of your luscious Biscoff Icebox Cake.
Step 2: Fold in the Biscoff Spread
Gently fold the Lotus Biscoff spread into the whipped cream mixture until just combined. Be careful not to deflate the whipped cream; you want it to remain airy and creamy. This step infuses the cake with that signature cookie butter flavor, making your Biscoff Icebox Cake irresistibly delicious.
Step 3: Prepare the Biscoff Spread for Drizzling
Take the remaining Biscoff spread and microwave it on a microwave-safe dish for about 10-15 seconds until it’s runny. This will make it easier to drizzle over your layered cake later. It should be warm but not hot; you want it to flow smoothly without cooking the other ingredients in your cake.
Step 4: Line the Loaf Pan
Grab a 9×5 loaf pan and line it with plastic wrap, leaving some overhang on the sides. This will help you easily remove the Biscoff Icebox Cake after setting. Make sure the wrap is smooth and snug against the pan to provide a nice shape for your delicious layers to come.
Step 5: Start Layering the Cake
Spread a thin layer of the whipped Biscoff cream at the bottom of the lined loaf pan. This base layer will help anchor your biscuits. Use a spatula to create an even layer, ensuring it covers the bottom completely, setting the stage for the delightful crunch of the Biscoff biscuits.
Step 6: Add Biscoff Biscuits and More Cream
Place a layer of Biscoff biscuits on top of the whipped cream, covering it fully. Then, scoop about one-third of the whipped cream mixture over the biscuits and spread it evenly. Drizzle some of the runny Biscoff spread over this layer, enriching your Biscoff Icebox Cake with additional flavor and moisture.
Step 7: Repeat Layers
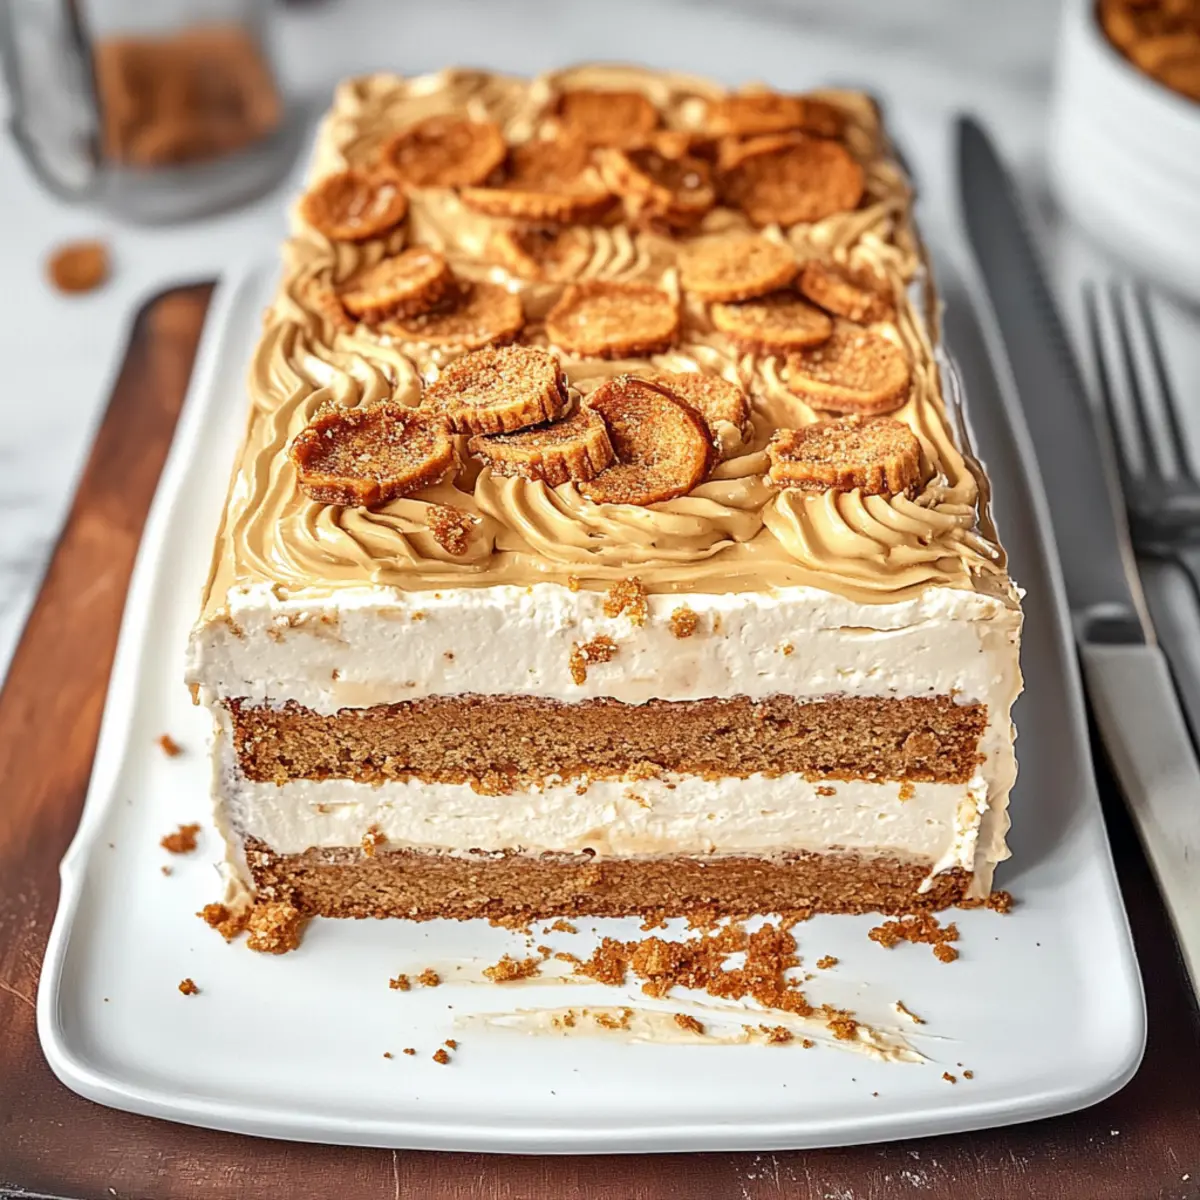
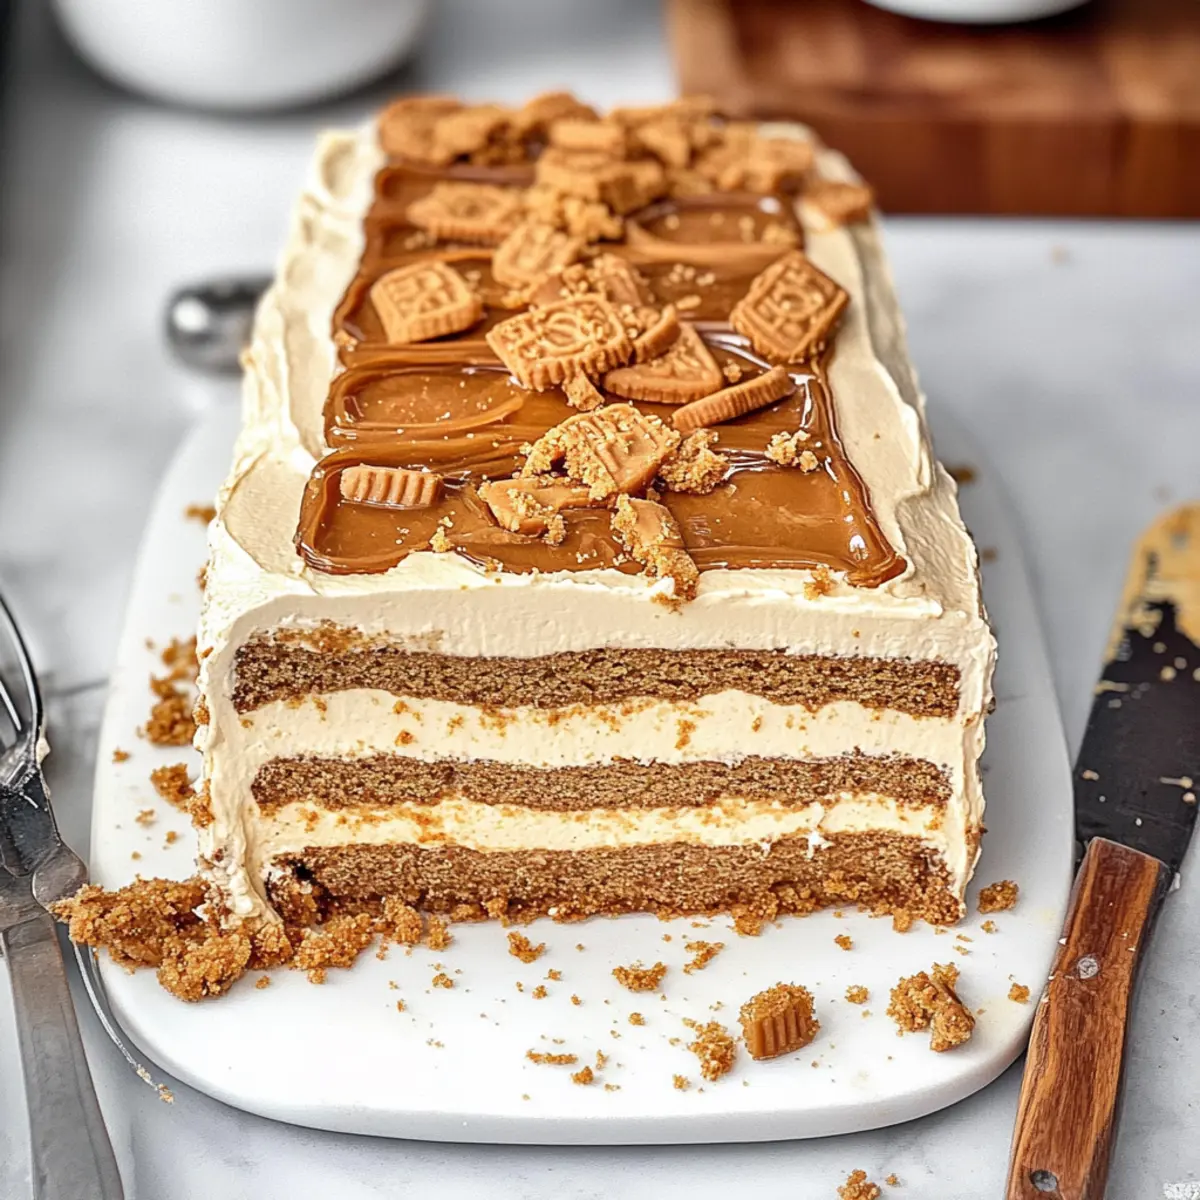
Continue the layering process by repeating the biscuits, cream, and drizzle twice more. After the final biscuit layer, top it with any remaining whipped cream mixture, smoothing it into an even layer on top. Finish with an extra drizzle of the melted Biscoff spread to make your cake visually enticing.
Step 8: Freeze the Cake
Cover the top of the loaf pan with the overhanging plastic wrap. Then, place the pan in the freezer for at least 2 hours, or ideally overnight. This freezing step allows your Biscoff Icebox Cake to set properly, making it easier to slice into perfect servings later on.
Step 9: Soften and Serve
Once set, remove the Biscoff Icebox Cake from the freezer and let it sit at room temperature for about 15 minutes. This softening period will make it easier to slice through the creamy layers. When ready, carefully lift the cake from the pan using the plastic wrap, slice, and serve this delightful treat to your eager guests!

Biscoff Icebox Cake Variations
Feel free to get creative with your Biscoff Icebox Cake and add your own personal touch!
- Dairy-Free: Substitute heavy cream with a coconut cream alternative for a tropical twist.
- Chocolate Delight: Drizzle melted chocolate over the layers for a thrilling cocoa flavor. It’s like adding a rich chocolate hug to your cake!
- Nutty Crunch: Mix in chopped nuts like pecans or almonds for a delightful crunch. This will give each bite a satisfying texture that pairs beautifully with the creaminess.
- Seasonal Fruit: Layer in fresh berries or banana slices for a fruity flavor boost. They add a refreshing contrast to the sweetness of the cake.
- Spicy Kick: Add a sprinkle of cinnamon or a dash of cayenne pepper to the whipped cream for a subtle warmth. This little twist can elevate the flavors dramatically!
- Mini Bites: Create individual servings by using muffin tins instead of a loaf pan. Perfect for parties or meal prep, and they look adorable too!
- Caramel Drizzle: Top with silky caramel sauce for an extra layer of richness and decadence. It’s hard to resist that dreamy combination!
By exploring these variations, you can make your Biscoff Icebox Cake uniquely yours. Looking for more delicious desserts? Check out our scrumptious Snowball Cake Light or the indulgent Chocolate Biscoff Tart. Enjoy the sweet adventure!
What to Serve with Biscoff Icebox Cake
Serve the Biscoff Icebox Cake for a delightful end to any meal, perfectly pairing with various accompaniments that elevate its deliciousness.
-
Fresh Berries: The tartness of fresh berries adds a refreshing contrast to the rich creaminess of the cake. Consider strawberries or raspberries for a bright pop of color and flavor.
-
Drizzled Chocolate Sauce: A warm chocolate drizzle melts into the cake, enhancing the decadent experience and creating a delightful harmony with the spiced notes of the Biscoff.
-
Vanilla Ice Cream: A scoop of creamy vanilla ice cream complements the cake’s texture while adding a cool creaminess that perfectly balances its richness.
-
Caramel Sauce: The sweet, buttery flavor of caramel sauce drizzled over the cake adds a delightful layer of indulgence. This combination intensifies the dessert’s dessert-like experience.
-
Coffee or Espresso: Pairing with a strong cup of coffee or a rich espresso enhances the flavors of the cake, making each bite even more satisfying.
-
Mint Leaves: Garnishing with fresh mint leaves not only brings a vibrant color but also offers a refreshing burst of flavor that contrasts beautifully with the cake’s sweetness.
-
Whipped Cream: Adding a dollop of fresh whipped cream can elevate the presentation and add extra creaminess, inviting every guest to indulge a little more.
Expert Tips for the Best Biscoff Icebox Cake
-
Chill Everything: Ensure both your bowl and whisk are cold. This helps the heavy cream whip up to perfect stiff peaks, crucial for the airy texture of the Biscoff Icebox Cake.
-
Taste Test: Before layering, taste the whipped cream. You can adjust the sweetness with extra condensed milk or sugar to match your preferences.
-
Microwave with Care: When microwaving the Biscoff spread, only heat it for 10-15 seconds. Overheating can turn it too hot, affecting the texture.
-
Layer Wisely: Use an even spread of whipped cream between layers. This ensures every bite of your Biscoff Icebox Cake has that delicious balance of creaminess and cookie crunch.
-
Storage Tip: Leftover pieces can be wrapped tightly and stored in the freezer for up to two weeks, maintaining that lovely creamy texture for an indulgent treat later.
Make Ahead Options
Preparing the Biscoff Icebox Cake ahead of time is a game changer for busy home cooks! You can assemble the entire cake and freeze it for up to 3 days in advance, saving you precious time on the day of an event. After layering the whipped cream and Biscoff biscuits in the lined loaf pan, simply cover it tightly with plastic wrap to prevent freezer burn. When you’re ready to serve, allow the cake to thaw in the refrigerator overnight or at room temperature for about 15 minutes before slicing. This method ensures the Biscoff Icebox Cake remains just as delicious as when freshly made, making entertaining effortless and stress-free!
How to Store and Freeze Biscoff Icebox Cake
Fridge: Store your Biscoff Icebox Cake in the refrigerator for up to 3 days, tightly covered with plastic wrap to maintain its creamy texture and prevent it from absorbing odors.
Freezer: For longer storage, place the wrapped cake in the freezer for up to 2 weeks. Make sure it’s securely covered to avoid freezer burn, ensuring that delicious flavor remains intact.
Thawing: When ready to enjoy, remove the cake from the freezer and let it sit at room temperature for about 15 minutes to soften before slicing. This restores its velvety creaminess.
Serving Suggestions: You can serve any leftovers cold or slightly thawed, offering a perfect balance of crunchy and creamy in every bite of your Biscoff Icebox Cake.
Biscoff Icebox Cake Recipe FAQs
What type of Biscoff cookies should I use?
You can use any brand of speculoos biscuits, but I highly recommend Lotus Biscoff biscuits for their authentic flavor. Look for cookies without any dark spots or signs of staleness, which can affect the texture of your cake.
How do I store my Biscoff Icebox Cake, and how long will it last?
Store your Biscoff Icebox Cake tightly wrapped in plastic wrap in the refrigerator for up to 3 days. For longer storage, it can be kept in the freezer for up to 2 weeks. Just ensure it’s well-covered to prevent freezer burn and preserve that delightful taste!
Can I freeze the Biscoff Icebox Cake?
Absolutely! After layering and before serving, wrap your cake tightly in plastic wrap or aluminum foil and freeze it for up to 2 weeks. To serve, just let it thaw at room temperature for 15 minutes before slicing, which gives you that perfect creamy texture.
What should I do if the whipped cream doesn’t whip properly?
If your whipped cream isn’t reaching stiff peaks, ensure that your bowl and whisk are completely cold before starting. If it still doesn’t whip, it might be due to the cream being too warm or not high enough in fat content. You can always add a tablespoon of cold powdered sugar to stabilize it and try whipping it again.
Are there any dietary considerations for this dessert?
Yes! This Biscoff Icebox Cake is vegetarian and can easily be considered halal, depending on the ingredients you use. Always check that the sweetened condensed milk and Biscoff spread comply with your dietary needs. If allergies are a concern, ensure that there are no added ingredients that might cause a reaction.
Can I customize the flavors in my Biscoff Icebox Cake?
Very much so! You can experiment with different flavored cookie butters if you’re looking for a twist. For a chocolatey kick, drizzle some melted chocolate over the layers or substitute some of the Biscoff spread with chocolate hazelnut spread. The more the merrier!
Indulge in Biscoff Icebox Cake: No-Bake Bliss Awaits
Ingredients
Equipment
Method
- In a large, cold mixing bowl, combine heavy cream and sweetened condensed milk. Whip on medium-high speed until stiff peaks form, about 3-5 minutes.
- Gently fold in the Lotus Biscoff spread until just combined.
- Microwave the remaining Biscoff spread for about 10-15 seconds until runny for drizzling.
- Line a 9x5 loaf pan with plastic wrap, leaving overhang for easy removal.
- Spread a thin layer of the whipped Biscoff cream at the bottom of the loaf pan.
- Layer Biscoff biscuits on top of the whipped cream and then spread about one-third of the whipped cream mixture over the biscuits.
- Drizzle some of the warmed Biscoff spread over this layer.
- Repeat the layering process two more times, finishing with whipped cream on top and an extra drizzle of Biscoff spread.
- Cover the top with plastic wrap and freeze for at least 2 hours or overnight.
- Remove from the freezer and let sit at room temperature for about 15 minutes before slicing and serving.
Leave a Reply